Growing Mushrooms: From Mycelium to Microdose in 10 Easy Steps
Growing legally in The Bahamas due to the unregulated nature of psilocybin in The Bahamas. For educational purposes only.
Let me paint the picture, it was December 2021, my close friend and soul partner and I were cozying up on the couch preparing to do what’s commonly known as a ‘heroic dose’ of mushrooms.
Both of us have been into psychedelics and plant medicine since our teenage years and were discussing how stoked we were to see psychedelics getting lots of new attention and support on popular parenting sites.
Since then, we've set up our first grow chambers and after a few noob mistakes have gotten the hang of growing mushrooms on demand. In this 10-step guide we'll teach you how to inexpensively set up a small fruiting chamber and grow mushrooms for use on your healing journey.
We think it’s super important to share this information because we almost shelled out a couple hundred dollars to join a mushroom growing course earlier this year but figured we had each done so much research on our own that it was worth taking a stab at trying to grow our first flush by ourselves. I mean, who doesn’t love a good D.I.Y. project, right? And honestly, we were both so over the thought of joining yet another course with its bloated PDFs, Zoom calls and 20-too many expert interviews.

We were quickly able to successfully grow enough flushes to provide the two of us with mushrooms to begin our first year of microdosing, extra for partaking in macro doses if we chose, and enough spores to last a lifetime!
If this sounds cool to you, keep reading to find out how you can easily create the closest thing we’ve found to a contamination-proof, “set-it-and-forget-it” mushroom growing mini-factory.
This is a mega-guide. Do yourself a favor and grab the printable version here. Good luck and happy growing!
What you’ll need:
Brown Rice Flour - available by the bag in most grocery stores. Its function is to feed the growing fungus.
Vermiculite - available by the bag in garden supply shops, big box chains or Amazon. Its function here is to hold both water and air.
Distilled water - ensures that chlorine and other chemicals found in tap water don’t hinder the mushroom growing process.
A syringe of spores in water - we got ours from sporeworks.com.
6 wide mouth half-pint canning jars with lids - important that the jars have a wide mouth so the cake can slide out easily.
Aluminum foil to cover the lids of the jars during the sterilization process.
A large pot or pressure-cooker
A mini rotary tool or a hammer and nail - for punching air holes in your jar’s lids
A lighter - for sterilizing the tip of your needle as you inoculate your canning jars.
A fruiting chamber - We explain ShoeBox Tek in this guide because it's the easiest to set up and doesn’t require much time/effort to maintain.
A spray bottle for misting your mushrooms. We also recommend using one filled with alcohol during prepwork to sterilize your workspace.
Loaf-sized disposable baking pan (or aluminum foil) to use in fruiting chamber.
A clean enclosed room to work in with minimal airflow - we have yet to try a specialized hood or box. More power to you if you choose to use one.
An incubator/way to control the temperature (Depending on the temperature/season) - can be a simple cabinet, space in your closet or a specially constructed heated box. We personally have not tried an incubator in any of our grows to date, but we also live in a tropical climate.
Part 1
Aside from using a shoebox sized fruiting chamber, the remainder of this tek is the classic PF Tek method.
The basic idea here is that we are going to grow your chosen fungus in canning jars with a mix of vermiculite, brown rice flour, and water. The brown rice flour is the food the fungus consumes.
The vermiculite is the substrate (medium/material) that the spores will live and grow on. Combined with the water, these two items offer the nutrition, moisture, and energy that mushrooms require to grow fruit.
How Long Does The PF Tek Method Take?
Each grow and mushroom type will be different but on average the entire PF Tek process can take about 4 weeks before your mushrooms are ready to be harvested.
Most of this time will be you waiting and trying your darndest not to check-in on your mushrooms. If you can, resist this urge as constantly raising the lid on your grow box will change your FAE (air exchange).
The other parts of the process take hardly any time at all, I usually knock them out early on a Saturday morning along with a cuppa coffee.
Preparing the substrate and jars may take an hour of time.
Sterilizing brown rice flour substrate takes a minimum of 1.5 hours and then left to cool overnight. Be aware that other types of substrates, such a bird seed and other types of grains may require longer sterilization periods.
Inoculation takes about 15 minutes, but give yourself an extra 10 mins to create a clean work area. Rubbing alcohol is your friend here. There is no such thing as too clean as growing mushrooms can be a temperamental process in the beginning.
After inoculation it may take 2 - 3 weeks for the mycelium to work its way through the substrate and finish colonizing.
Once colonized and in the fruiting chamber, pins take 3 - 14 days to form and a few days after that you are ready to harvest.
Step 1: Prep your space and jars
For the next steps you’ll need your jars, brown rice flour, vermiculite, water, foil, and a large pot with a lid or a pressure cooker. Clean all items and disinfect using rubbing alcohol. Wipe down everything including the countertops and the materials you are using. I’ve gotten into the habit of showering and even washing my hair before my grow attempts to ensure that I am not the cause of unnecessary dust particles or contaminants floating around in the air.
During this stage we also used a mini rotary tool to create the 4 small holes on the lids of each of our jars so that they would be ready for use during Step 3.
Step 2: Prepare Your Brown Rice Flour (BRF) Cake Mix
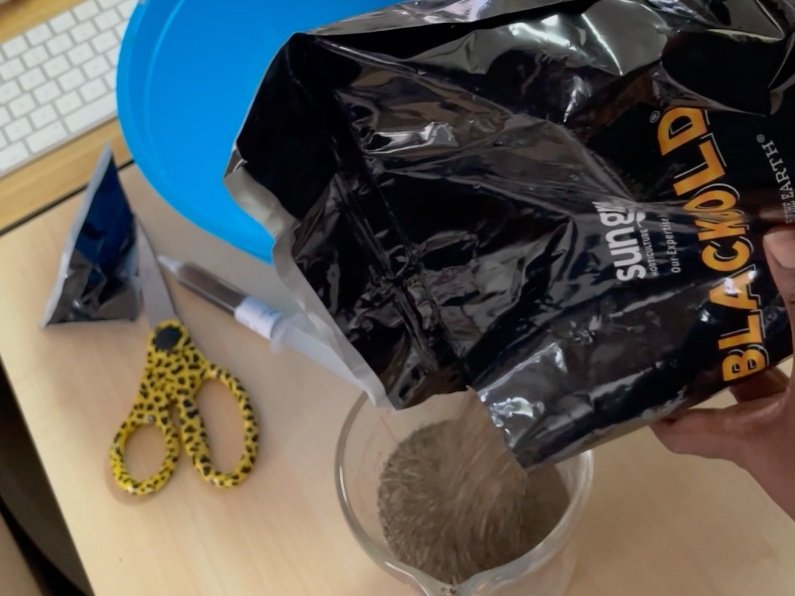
Figure 1: First grow attempt. Pouring vermiculite into a measuring cup.
The easiest method for measuring out your BRF cake mix ingredients is to use your grow jars. No need to dirty a measuring cup.
The basic recipe is as follows:
Two parts vermiculite
One part brown rice flour
One part distilled water
Plus, your syringe of mushroom spores.
Using one of your ½ pint canning jars, combine two jars worth of vermiculite, one jar of BRF and one jar of distilled water in a large bowl. This will provide you with enough substrate for your six jars.
Read up on field capacity. Essentially, this is ensuring that you have the correct amount of moisture in your mix, which is important for a good grow. You have achieved proper field capacity when you can take a large handful of your moistened mixture and squeeze it into a wet clump but not have so much water added that water drips out heavily.
Step 3: Pack and Seal Jars
In our first couple of attempts at growing mushrooms we always ended up with a few jars that would get contaminated during the inoculation process. This got to be really annoying because we’d have to throw away entire cakes, waste spores and also worry that the other jars could get contaminated. It also didn’t give us much substrate to work with if we wanted to try any type of casing layer in our fruiting chamber instead of leaving the substrate in cake form.
For our third grow attempt we decided to use some added precaution. Instead of only using a 1” thick layer of vermiculite at the top of the jar we filled each jar only half way with our BRF substrate mix and then packed the top half of the jar with clean vermiculite to create a wider barrier between the mycelium and the outside world.
It’s a bit easier to visualize using the picture below (Fig 1b) which shows the result of filling only the bottom half of the jar with mycelium mix.
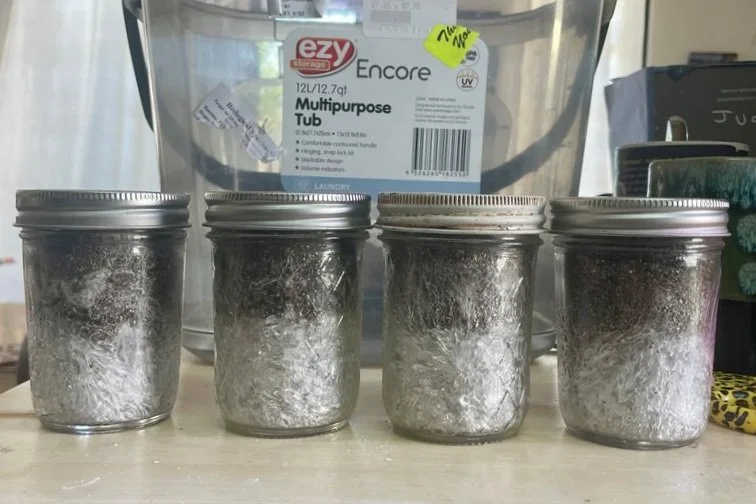
Figure 1b: What we call “shortie cakes” - inoculated BRF cakes formed using only ½ of the jar’s height with a wider vermiculite top layer.
We actually love this method and use it frequently because not only does it reduce contamination, it gives our mycelium less surface area to work through so full inoculation takes less time. I also believe that we don’t waste anything because whatever mycelium is stored in the cakes can still be used during subsequent flushes.
When filling your jars with substrate, do not press or tap down on the substrate. You want your substrate to be very loose so that the mycelium has space to move throughout the jar. Wipe any BRF mix off of the inside lip of your jars. This will ensure that you are not potentially feeding/luring contaminants into your jars. Top the remainder of the jar with clean, dry vermiculite all the way to the brim.
Screw the lids on your jars. The lids should already each have 4 holes along their perimeter from our prep work in Step 1.
Wrap your lids in foil.
Now you are ready to sterilize.
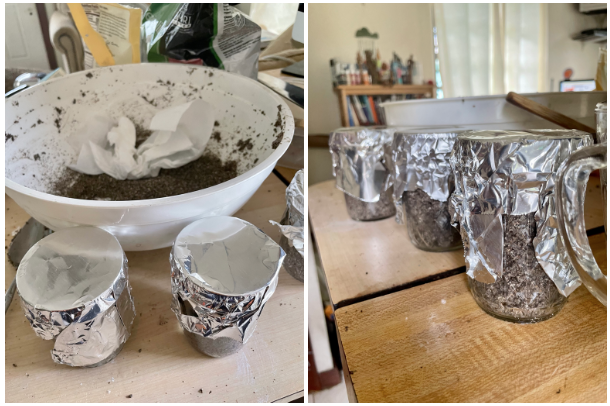
Figure 2 and 3: Loaded jars wrapped in foil and ready to be sterilized.
Step 4: Sterilize Your Jars
Figure 4: Giving the jars a steam-bath
How to sterilize without a pressure cooker: If you do own a pressure cooker you can sterilize your jars and their contents by giving them a steam bath in a large pot with a lid for an hour and a half.
Place a kitchen cloth at the bottom of your pot to prevent the jars from getting tossed around by the bubbling water. Fill the pot with enough water to halfway cover your jars. Give a steam-bath for an hour and a half ensuring that you sterilize for the complete amount of time and that you add water as needed to your pot.
How to sterilize using a pressure cooker: Place a small towel/cloth at the bottom of the pressure cooker to prevent cracking your glass jars. Place the jars in your pressure cooker and add enough water to submerge your jars halfway. Sterilize for an hour and a half at 15psi.
Let the cooker or pot cool down completely before handling jars.
Step 5: Inoculate
Once your jars are cool it’s time to ‘noc them up! For this step you’ll need your spore syringe and lighter.
Remove the foil covering. Sterilize the syringe needle by heating it red-hot in a flame, allow it to cool and then inject the spore solution into the jars through the holes in the lids (leave the lids on!).
You may hear a little sizzling sound as the spore mixture floods into the still hot needle. This is fine, but if you are worried wait a few more seconds for your needle tip to cool off more.
Stick your needle as far down into the hole as you are able. For shortie cakes your needle tip may not be long enough to reach to the bottom half of your jar. We’ve found from previous grows that this hasn’t stopped the spores from seeking out and absolutely ravishing the substrate mixture.
Inject a little of your spore juice through each hole, angling the needle tip so the spore solution ends up squirting on the inside of the glass. By doing this, the growing mycelium will be visible as soon as possible and you can stop worrying about whether your spores germinated.
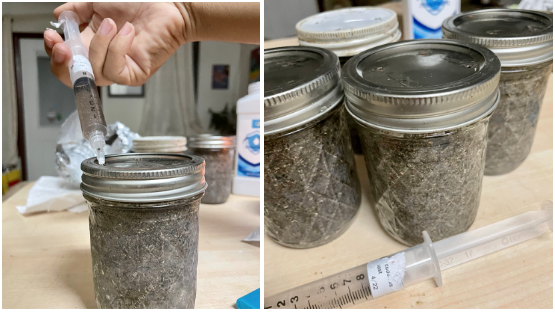
Figure 5: The sterilized substrate being inoculated with a spore syringe. Figure 6: All ‘noced up and ready to incubate
Then put your inoculated jars in your incubating tub. Incubating the jars is when you let them sit in a warm, dark area as the mycelium colonizes the substrate. The temperature range the mushrooms need will vary depending on the species, but so far we’ve been able to simply store our jars in a bedroom closet without an additional heat source.
Once the circumference of the jar is covered in bright white mycelium wait a few extra days to allow the mycelium to work its way through the center. Any color other than bright white is a sign of contamination. You do not want to see green, pink or yellow. Blue nor black. Or white tinged with pink. Just white.
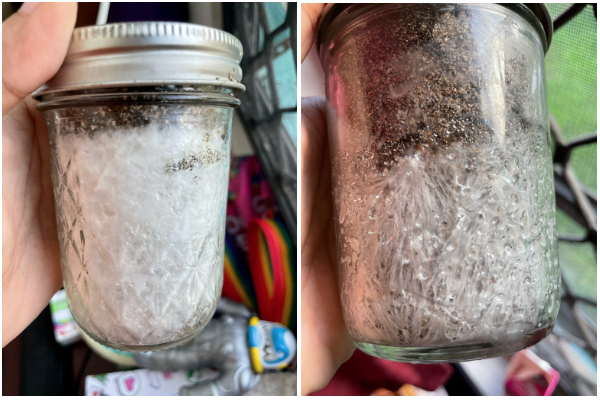
Figure 7: Grow Attempt #2 - Fully inoculated jar with ~1” thick layer of vermiculite barrier layer at top of jar. Figure 8: Grow Attempt #3 - shortie cake with half of the jar filled with the vermiculite barrier layer.
Get the printable version of this mushroom growing guide here.
Part 2
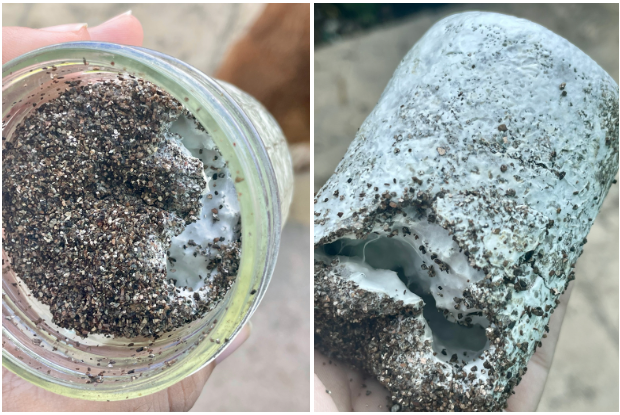
Figure 10: inoculated Treasure Coast cake inside of jar. Figure 11: Same inoculated Treasure Coast cake after being removed from jar
Step 6: Birth Your Cakes
In most cases your inoculated cake will slide right out of the jar, if it doesn’t a few gentle taps on a bike tire or the palm of your hand should be enough to dislodge it.
Step 7: Dunk, Scrape and Roll
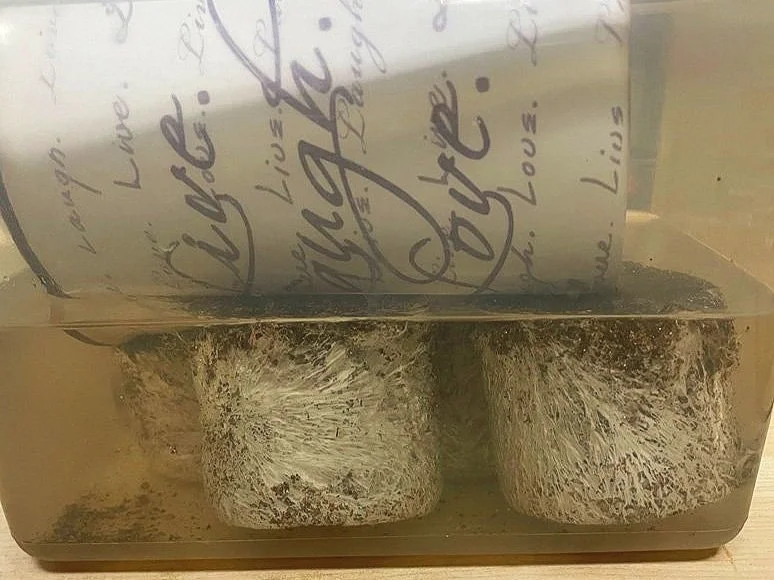
Figure 12a: Soaking cakes in distilled water
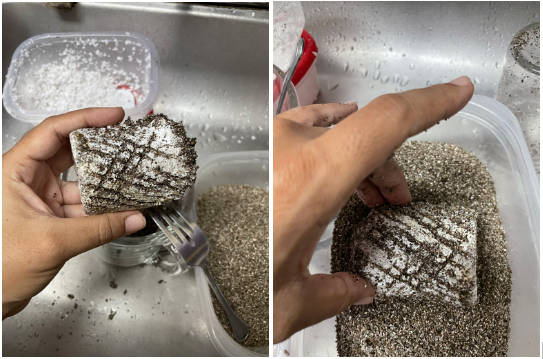
Figure 12b: Scraping surface with fork. Figure 12c: Rolling cake in clean vermiculite.
Submerge cakes in distilled water for 12 - 20 hours to hydrate and stimulate fruiting.
Make sure to remove the cakes from water by the 24 hour mark or else it is possible to drown your mycelium.
To prevent the cakes from floating, place a large mug or small dish on top of your cakes to submerge them (Figure 12a).
Once you remove the soaked cakes from their bath, give them a gentle scrape with a fork and roll in clean vermiculite as shown in Figures 12b and 12c.
Step 8: Shoebox Fruiting Chamber
There are many styles of fruiting chambers (shotgun, monotubs, dubtubs, etc.) and fruiting mediums (coco coir and coir/vermiculite mix are both popular).
Having a low-tech setup was super important to us as busy moms. We chose to use a shoebox fruiting chamber for its ease of use knowing that it would produce smaller yields. We were a-okay with that because its compact size makes the perfect mini-greenhouse - no drilling or heavy fanning/maintenance required. If you decide to use a different type of fruiting chamber we’d love for you to share what you chose to use with us over on TikTok.
Benefits of the shoebox method:
Simple to set-up - The easiest fruiting chamber - no drilling, may not need to fan - just perlite in a 6qt plastic bin with lid
Only takes up about a square foot of space - Can fit easily on your nightstand, countertop, or altar
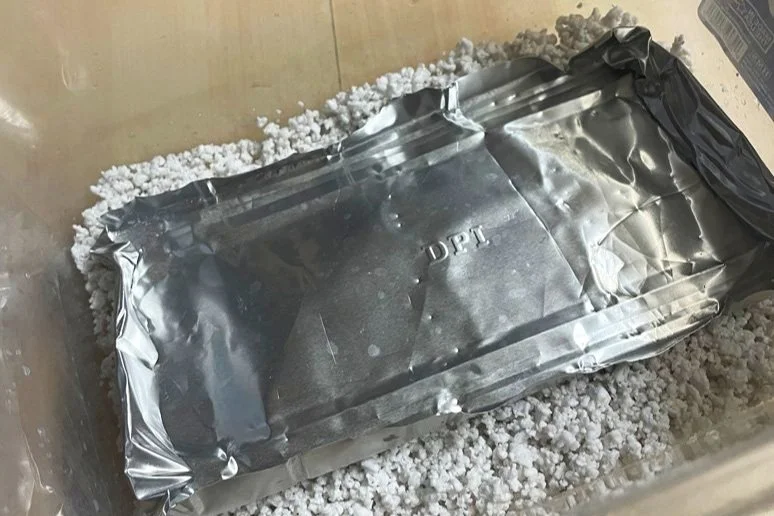
Figure 13: Moistened perlite and pan bottom
⭐ We recommend cutting the bottom off of a disposable baking pan and using that instead of aluminum foil in your growing chamber. The pan is way more sturdy and can be used for multiple grows.
The dampened perlite layer naturally increases the humidity in the chamber without the use of an added humidifying machine. Be aware that perlite is dusty, so you’ll want to add a cup or two to a large clean bowl and moisten it with the water first before pouring it into your shoebox to avoid dust from flying everywhere!
Level out your perlite in the container. It should take up the bottom 1” - 1 ½” of your shoebox.
Once all your cakes have been rolled in vermiculite and are in your shoebox it’s time to mist them with water. Where the droplets land is where your pins will form.
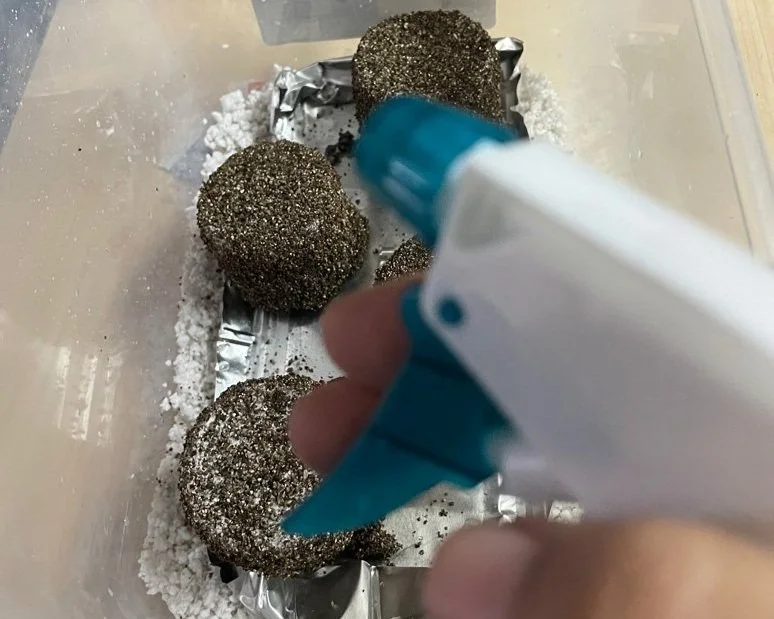
Figure 14: Misting
Not all spray bottles are created equal. Doesn’t need to be fancy, we got ours at the dollar store. Look for one that provides a fine mist option. You want tiny droplets of mist to dance along the exterior of your cakes - you are not waterboarding them! You also want to avoid water pooling on your pan bottom/foil.
Put the lid on your shoebox and set it up next to a window. If you don’t have a window readily available the light in your living room or kitchen is fine.

Figure 15: Airing cakes
Once in the morning and once in the evening/night remove the lid off of your shoebox and allow fresh air to be exchanged for about 10 minutes. Fanning usually isn’t required. If “fuzzy feet” develop at the base of your mushrooms (Fig. 17), you may choose to fan to increase air exchange, but fret not, the fuzzies won’t harm you if consumed or you can choose to cut them off at harvest time.
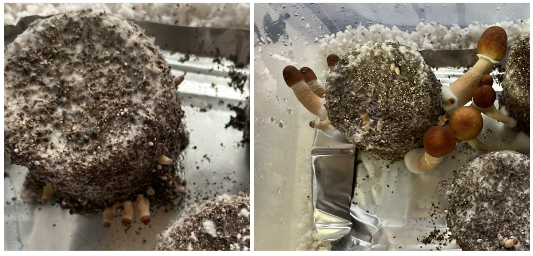
Figure 16: First pins ever on our third grow attempt! Figure 17: Less than a week later - these babies grow quickly.
Step 9: Harvest
Once pins form, it’ll only be a few more days until the mushrooms have grown large enough to harvest.
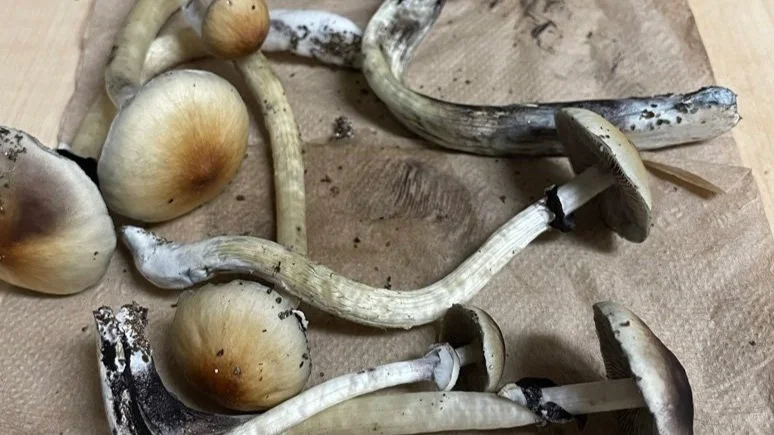
Most forum posters agree that the best time to harvest is right before / or as the veil of the mushroom is torn open. (Fig. 18)
Waiting too long after the veil is ripped will result in spores falling onto your BRF cakes which signals to the mycelium that the grow cycle is over.
Also, if you pick earlier rather than later you get bigger 2nd and 3rd flushes as you’re leaving more nutrients in your cake to aid in future growth.
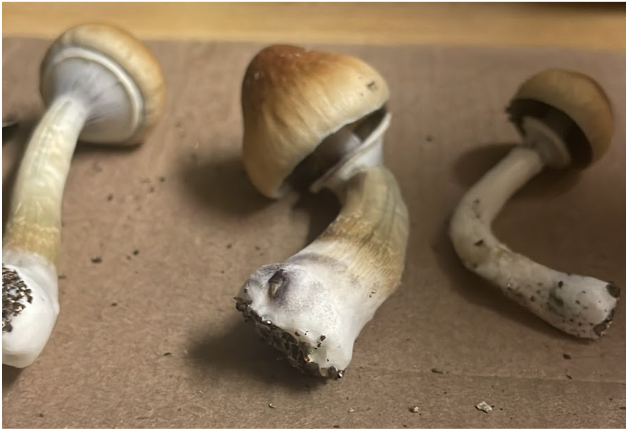
Figure 18: Difference between closed veil (on left) and ripped veils (at center and right)
Harvest the mushrooms by cutting at their base with a knife or scissors. You may also choose to twist or pull the mushrooms from the base but risk tearing your cake.
To signal to your cake that the current growing period is over, remove all the mushrooms including the super tiny/aborted pins that didn’t fully develop before starting a new fruiting cycle with the same cake.
Step 10: Dehydrate
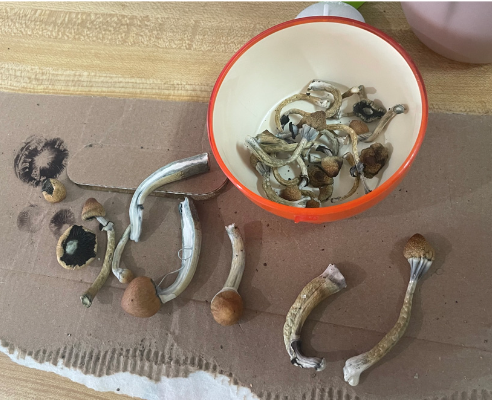
Figure 19: Mushrooms at varying stages of air drying.
No need to invest in a dehydrator during your first few grows, your oven / toaster oven works just as well.
Preheat your oven to 150 degrees and arrange mushrooms in a single layer on a baking sheet. Bake for one hour before flipping over to the other side. Bake for an additional hour or until the mushrooms are “cracker dry”.
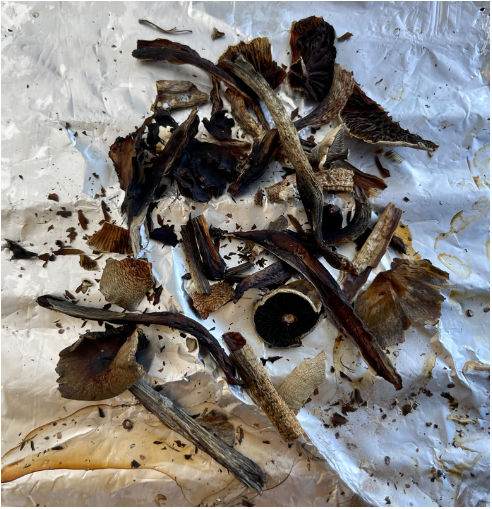
Figure 20: Mushrooms after dehydrating in the oven.
Remove from the oven, allow to cool and store in an airtight container for up to three months.
It’s not too late to grab the printable version of this mushroom guidebook here. The grow guide also includes the benefits of growing your own mushrooms at home and an introduction to microdosing.
We hope you found this helpful.